To interface an LCD with an Arduino without using a potentiometer for brightness control or an I2C module, you can connect the LCD directly to the Arduino using the standard parallel interface. Here’s how you can do it:
Components Needed:
- Arduino ( Uno or any other)
- 16×2 LCD
- Jumper wires
- 220Ω resistor (for backlight)
- 10kΩ resistor (optional, for contrast adjustment)
- Breadboard
Here’s the summary of the connections in table form:
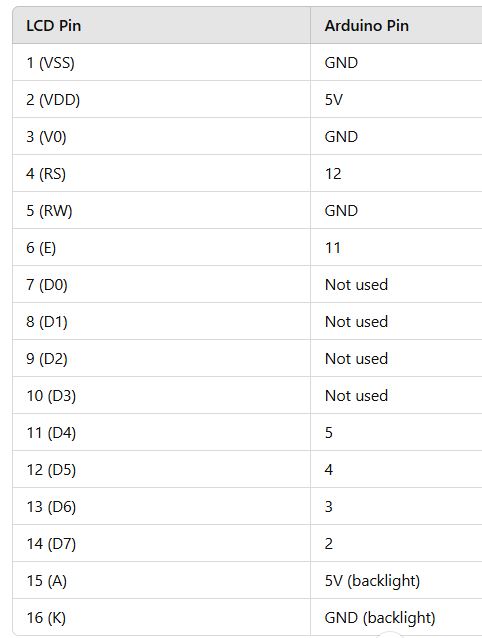
Wiring the LCD to Arduino (Without Potentiometer and I2C Module)
For a 16×2 LCD, the standard connections are as follows:
- LCD Pin 1 (VSS) → Arduino GND (Ground)
- LCD Pin 2 (VDD) → Arduino 5V
- LCD Pin 3 (V0) → Arduino GND (If you’re not using a potentiometer, you can try connecting it to GND to set the contrast at a fixed level)
- LCD Pin 4 (RS) → Arduino Pin 12
- LCD Pin 5 (RW) → Arduino GND (We will always write to the LCD, so the Read/Write pin is grounded)
- LCD Pin 6 (E) → Arduino Pin 11
- LCD Pin 7-14 (D0-D7) → Arduino Pin 5, 4, 3, 2, 7, 6, 10, 9 (These are data pins; you can connect 8 data pins to the Arduino, but for simplicity, we’ll use the 4-bit mode, so only connect D4-D7)
- LCD Pin 15 (A) → Arduino 5V (Backlight anode)
- LCD Pin 16 (K) → Arduino GND (Backlight cathode)
Arduino Code:
#include <LiquidCrystal.h>

LiquidCrystal lcd(12, 11, 5, 4, 3, 2);

void setup() {
  lcd.begin(16, 2);
  lcd.print("Hello, World!");
}

void loop() {
}
Optional Modifications:
- If you want to change the contrast manually, you can try placing a fixed resistor (like 1kΩ) between V0 (Pin 3) and GND.
- If the backlight is too bright or dim, you can adjust the resistor (220Ω) value connected to the backlight pins.
This setup should allow you to interface the LCD with your Arduino Uno without the need for a potentiometer or I2C module.