In this tutorial, we’ll show you how to build a simple stopwatch using Arduino. This project will involve setting up a button to start and stop the timer, while displaying the elapsed time on an LCD screen. It’s a great beginner project for understanding how to use buttons, LCDs, and time functions in Arduino.
What You’ll Need
Before you start, gather the following components:
- Arduino Uno (or any other compatible Arduino board)
- 16×2 LCD Display (with I2C interface)
- Pushbutton
- Breadboard and jumper wires
- USB cable (to connect your Arduino to your computer)
- Arduino IDE (installed on your computer)
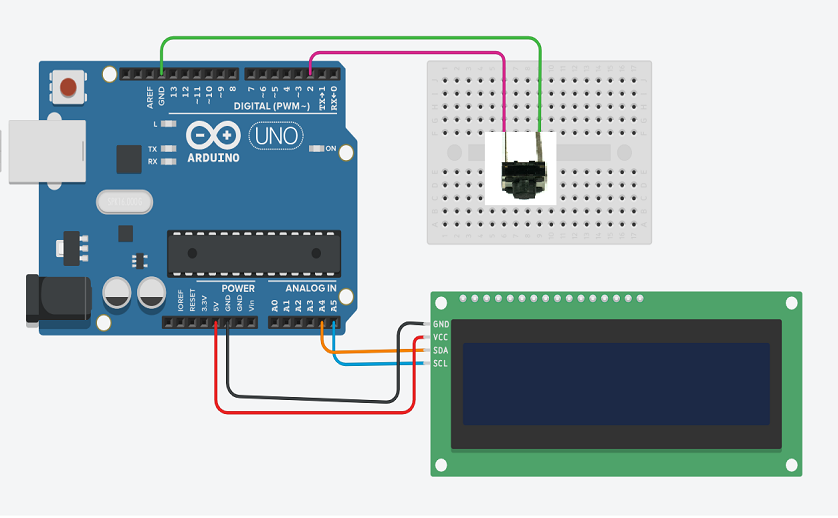
Wiring the Components
1. LCD Display Wiring:
The 16×2 LCD with I2C interface makes connecting the display easy. It only requires 4 pins: VCC, GND, SDA, and SCL. Here’s how to wire it:
- VCC -> 5V (on the Arduino)
- GND -> GND (on the Arduino)
- SDA -> A4 (on the Arduino)
- SCL -> A5 (on the Arduino)
2. Button Wiring:
The button is used to start and stop the stopwatch. We’ll connect it to a digital input pin and use a pull-down resistor to ensure the pin reads LOW when the button is not pressed.
- One side of the button connects to pin 2 on the Arduino.
- The other side connects to GND.
Setting Up the Arduino Code
Now let’s write the code to make the stopwatch functional.
Step 1: Include Required Libraries
We need the Wire and LiquidCrystal_I2C libraries to interface with the LCD.
#include <Wire.h>       // Required for I2C communication
#include <LiquidCrystal_I2C.h> // LCD library for I2C

// Pin definitions
const int buttonPin = 2;  // Pin connected to the pushbutton
volatile bool isRunning = false; // Stopwatch state (running or stopped)
unsigned long startTime = 0;  // Time when the stopwatch started
unsigned long elapsedTime = 0; // Elapsed time in milliseconds
unsigned long previousMillis = 0; // Store the last update time

// LCD object (address, columns, rows)
LiquidCrystal_I2C lcd(0x27, 16, 2);  // I2C address 0x27, 16x2 display

// Debounce variables
unsigned long lastDebounceTime = 0;
unsigned long debounceDelay = 50; // 50ms debounce time

// Button state variables
int buttonState = 0;
int lastButtonState = HIGH; // Initially assume button is not pressed
bool buttonPressed = false;

void setup() {
  // Initialize the LCD
  lcd.begin(16, 2);  // Newer library requires you to specify size
  lcd.backlight();   // Turn on the backlight
  lcd.setCursor(0, 0);
  lcd.print("Stopwatch");

  // Set up the button pin
  pinMode(buttonPin, INPUT_PULLUP); // Use internal pull-up resistor
}

void loop() {
  // Read the state of the button
  int reading = digitalRead(buttonPin);

  // Check if button state has changed (for debouncing)
  if (reading != lastButtonState) {
    lastDebounceTime = millis();  // Reset debounce timer
  }

  // If the button has been pressed and enough time has passed
  if ((millis() - lastDebounceTime) > debounceDelay) {
    if (reading == LOW && !buttonPressed) {
      buttonPressed = true;  // Mark button as pressed
      toggleStopwatch();  // Toggle the stopwatch state
    } else if (reading == HIGH) {
      buttonPressed = false;  // Mark button as not pressed when released
    }
  }

  // If the stopwatch is running, calculate elapsed time
  if (isRunning) {
    unsigned long currentMillis = millis();
    elapsedTime = currentMillis - startTime;
  }

  // Update the LCD display every second (1000 ms)
  if (millis() - previousMillis >= 1000) {
    previousMillis = millis();

    // Display elapsed time in seconds
    unsigned long seconds = elapsedTime / 1000;
    lcd.clear();
    lcd.setCursor(0, 0);
    lcd.print("Time: ");
    lcd.print(seconds);
    lcd.print(" s");
  }

  // Save the current button state
  lastButtonState = reading;
}

void toggleStopwatch() {
  if (isRunning) {
    // Stop the stopwatch
    isRunning = false;
    lcd.setCursor(0, 1);
    lcd.print("Stopped      ");
  } else {
    // Start the stopwatch
    isRunning = true;
    startTime = millis() - elapsedTime; // Set the starting time
    lcd.setCursor(0, 1);
    lcd.print("Running...   ");
  }
}
How It Works
- Button Press: Each time you press the button, the stopwatch will toggle between “running” and “stopped” states.
- Start Stopwatch: When the stopwatch is started, the Arduino records the starting time with
millis(), which returns the number of milliseconds since the program started. The elapsed time is updated every loop iteration and displayed on the LCD. - Stop Stopwatch: When you press the button again, the stopwatch stops, and the final time is stored. You can resume from where you left off or reset the timer by pressing the button again.
- LCD Output: The time is displayed in minutes and seconds on the LCD. The format is
MM:SS, whereMMis the minutes andSSis the seconds.
Final Thoughts
This simple Arduino stopwatch project is a great way to get hands-on experience with buttons, LCDs, and time-based programming on Arduino. You can easily extend this project by adding features like reset functionality, time limits, or even controlling multiple stopwatches.
Feel free to experiment with the code and try adding more functionality to make it your own! If you run into any issues or have questions, don’t hesitate to leave a comment below. Happy building!